- Home
- [NEW] ¿Cómo instalar un ventilador de techo?
- [NEW] ¿Cómo instalar un ventilador de techo?

¿Cómo instalar un ventilador de techo?
Aunque instalar o reemplazar un ventilador de techo puede parecer complicado, la instalación de un ventilador de techo es un proceso relativamente sencillo. Con algunas herramientas y materiales básicos, puede aprender a colgar un ventilador de techo en tan solo unos pasos. Tenga en cuenta que esta guía de instalación de ventiladores de techo es un complemento del manual de su modelo específico de ventilador de techo; utilice el manual que viene con su ventilador de techo para obtener instrucciones de instalación detalladas.
¿Cómo instalar un ventilador de techo?
- Empezando
- 1. Desinstalar y quitar un accesorio existente
- 2. Instalar el soporte del techo
- 3. Conecte los cables del ventilador de techo
- 4. Terminar de instalar la cubierta o la carcasa del motor
- 5. Instalar las aspas
- 6. Instalar la iluminación
- 7. Utilice los controles remotos
- 8. Instalación de ventiladores de techo HunterExpress®


La siguiente guía de instalación de ventiladores de techo de Hunter Fan debería ayudarlo a navegar por el proceso de instalación de un ventilador de techo con instrucciones paso a paso para quitar un artefacto existente, garantizar un cableado adecuado del ventilador de techo y más. Cuando consulte nuestra guía de instalación de ventiladores de techo, tenga en cuenta lo siguiente:
- Los videos e instrucciones incluidos en la guía generalmente se aplican a la instalación de la mayoría de los ventiladores Hunter, sin embargo, las instrucciones para su modelo de ventilador específico pueden diferir levemente.
- Esta guía debe utilizarse únicamente como material complementario del manual del ventilador específico del modelo incluido con la compra de un ventilador de techo Hunter.
- Consulte siempre el manual para obtener las instrucciones más precisas para instalar su ventilador.
- Si ha perdido el manual, puede encontrar y descargar fácilmente el manual específico del modelo de su ventilador Hunter.
- Como alternativa a la instalación del ventilador de techo por su cuenta, puede contratar a un profesional para que lo instale.
Detalles del proyecto
Duración: 1-2 horas
El tiempo que lleva instalar el ventilador puede depender de varios factores, como su nivel de habilidad o experiencia y si trabaja solo o con un ayudante. Por lo general, la instalación de un ventilador de techo Hunter demora aproximadamente entre una y dos horas, aunque el modelo específico del ventilador que tenga puede afectar el tiempo de instalación.
Nivel de habilidad: Fácil
Si bien no es necesario tener mucha experiencia para instalar un ventilador de techo, cada situación es única, por lo que algunos proyectos de instalación pueden requerir más habilidad que otros. Si su proyecto requiere cableado adicional o no se siente cómodo con algún aspecto del proceso de instalación, comuníquese con un electricista profesional autorizado.
Costo: Rango
La cantidad de dinero que gaste en este proyecto variará según el costo del ventilador y si ya posee o necesita comprar/alquilar las herramientas necesarias para el proyecto. Para obtener más información sobre los precios, costos de un reemplazo estándar y la instalación de un nuevo ventilador de techo, comuníquese con el centro de ayuda de atención a clientes.
Empezando

Antes de comenzar su proyecto de instalación de ventiladores de techo Hunter, siga estos pasos para garantizar un proceso sencillo y seguro:
01. Asegúrese de mantener el ventilador a una distancia segura de otras paredes y del piso. Mantenga una distancia de 2 metros o más entre el piso y las aspas del ventilador.
02. Las puntas de las aspas del ventilador deben tener una distancia de 1 metro de la pared u obstrucción más cercana.
03. Si va a instalar el ventilador de techo en un techo inclinado, deberá comprar un tubo de extensión adicional. Si lo instala en un techo inclinado, mida el ángulo del techo.
04. Apague la energía tanto en el interruptor de pared como en el disyuntor.
Para su proyecto de instalación de ventilador de techo, debe asegurarse de practicar estas reglas generales de seguridad para evitar el riesgo de lesiones personales y daños a la propiedad:
- Desconecte la energía en el disyuntor antes de comenzar el proyecto. La energía debe permanecer desconectada hasta que se complete la instalación del ventilador.
- Siga todas las instrucciones del fabricante para obtener información adicional sobre seguridad, precauciones y advertencias.
- Verifique que el sitio de instalación tenga una caja aprobada para ventiladores de techo correctamente instalada y que sea adecuada para el peso de su ventilador, o confirme que puede colgar su ventilador de la estructura del edificio.
- Todo el cableado debe realizarse de acuerdo con los códigos eléctricos nacionales y locales ANSI/NFPA 70.
- Asegúrese de que no haya obstrucciones en el lugar de instalación del ventilador de techo.
- Compruebe siempre qué cables están activos utilizando un multímetro digital.
Si se siente incómodo al completar el paso de cableado del ventilador de techo o al manejar cualquier otra parte del proceso de instalación, contrate a un electricista profesional certificado.
- Para evitar dañar el ventilador, SIEMPRE levántelo sosteniendo la carcasa del ventilador o el tubo bajante.
- Para evitar lesiones graves o la muerte, asegúrese de que todos los tornillos estén bien apretados para asegurar la luminaria.
- Para evitar lesiones graves o la muerte, asegúrese de que el cristal de la lámpara esté correctamente asegurado.
- Para evitar lesiones graves o la muerte, SIEMPRE ajuste el tornillo de fijación con alicates y NO con la mano. VERIFIQUE que el tornillo de fijación esté ajustado con alicates cada vez que cambie la dirección del ventilador de techo.
- Para reducir el riesgo de lesiones personales, no doble los soportes de las aspas al instalarlos, equilibrar las aspas o limpiar el ventilador. No inserte objetos extraños entre las aspas giratorias del ventilador.
¿Qué herramientas se necesitan para instalar un ventilador de techo?
Para su proyecto de instalación de ventiladores de techo, necesitará tener a mano el conjunto de herramientas adecuado para trabajar de forma segura y finalizar a tiempo. Aunque las herramientas específicas que necesitará para su ventilador pueden variar según la marca y el modelo, aquí le presentamos algunas herramientas que puede tener a mano:
Escalera
Destornillador
Comprobador de cables
Taladro eléctrico
Alicates
Pelacables
9/64" Broca para taladro
Paso 1
Desinstalar y eliminar un accesorio existente
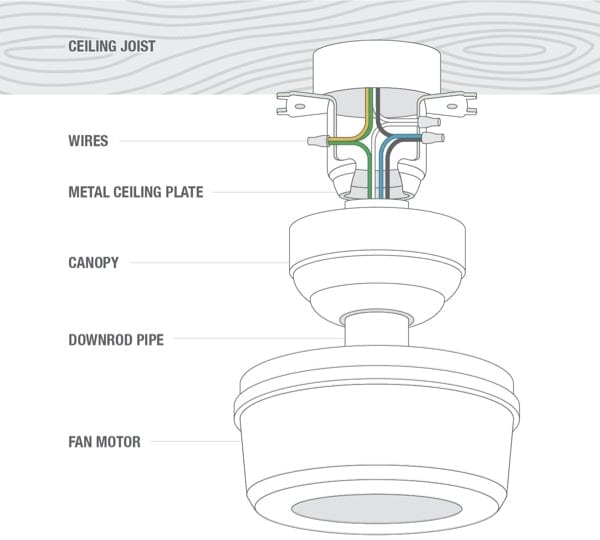
Instalar un nuevo ventilador de techo en comparación con reemplazar una luminaria existente requiere métodos diferentes. Aprenda a reemplazar un ventilador de techo con estos sencillos pasos:
01. Apague la energía en el interruptor de luz de pared y en el disyuntor.
02. Para mayor seguridad, coloque un trozo de cinta sobre el interruptor de luz de pared y el disyuntor para asegurarse de que no se vuelvan a encender accidentalmente mientras instala el ventilador.
03. Antes de hacer contacto con cualquier cableado eléctrico, utilice un probador de circuitos para verificar que la energía esté apagada.
04. Desconecte los cables y tornillos del artefacto existente que fijan el ventilador al techo.
05. Después de desinstalar la luminaria existente, verifique que la caja eléctrica sea apta para ventiladores de techo.
¿Qué es una caja eléctrica apta para ventilador de techo?
Una caja eléctrica apta para ventiladores de techo se utiliza para alojar las conexiones de cables eléctricos y soportar adecuadamente los artefactos pesados, como su ventilador Hunter. Este contenedor redondo u octogonal, que suele tener la etiqueta "Aprobado para ventiladores de techo" o "Aprobado para 32kg", debe montarse en una viga del techo, un bloque de madera o un soporte ajustable.
Si el soporte de techo de su ventilador Hunter es demasiado ancho para la caja eléctrica, lo más probable es que no sea una caja eléctrica apta para ventiladores de techo. Le recomendamos que contrate a un electricista certificado si necesita instalar uno.
¡Apagado!
La alimentación de la caja eléctrica apta para ventiladores de techo debe desconectarse en el disyuntor antes de instalar el ventilador Hunter. Use un voltímetro para confirmar que se haya desconectado el disyuntor correcto y que no haya electricidad fluyendo hacia ninguno de los cables que tocará.
Paso 2.
Instalar el soporte de montaje del ventilador de techo
Para garantizar un soporte adecuado del ventilador de techo, debe utilizar el soporte Hunter que viene con el ventilador para fijarlo de forma segura al techo. El soporte del ventilador de techo (con los cuatro parachoques hacia arriba) se puede instalar en el techo mediante dos métodos: directamente en la estructura del techo con los tornillos para madera provistos o en una caja eléctrica apta para ventiladores de techo.
A continuación, aprenda a instalar un soporte de montaje para ventilador de techo para su tipo específico de ventilador.
Si desea instalar un ventilador de techo HunterExpress®, vaya al final de esta guía para obtener instrucciones específicas.

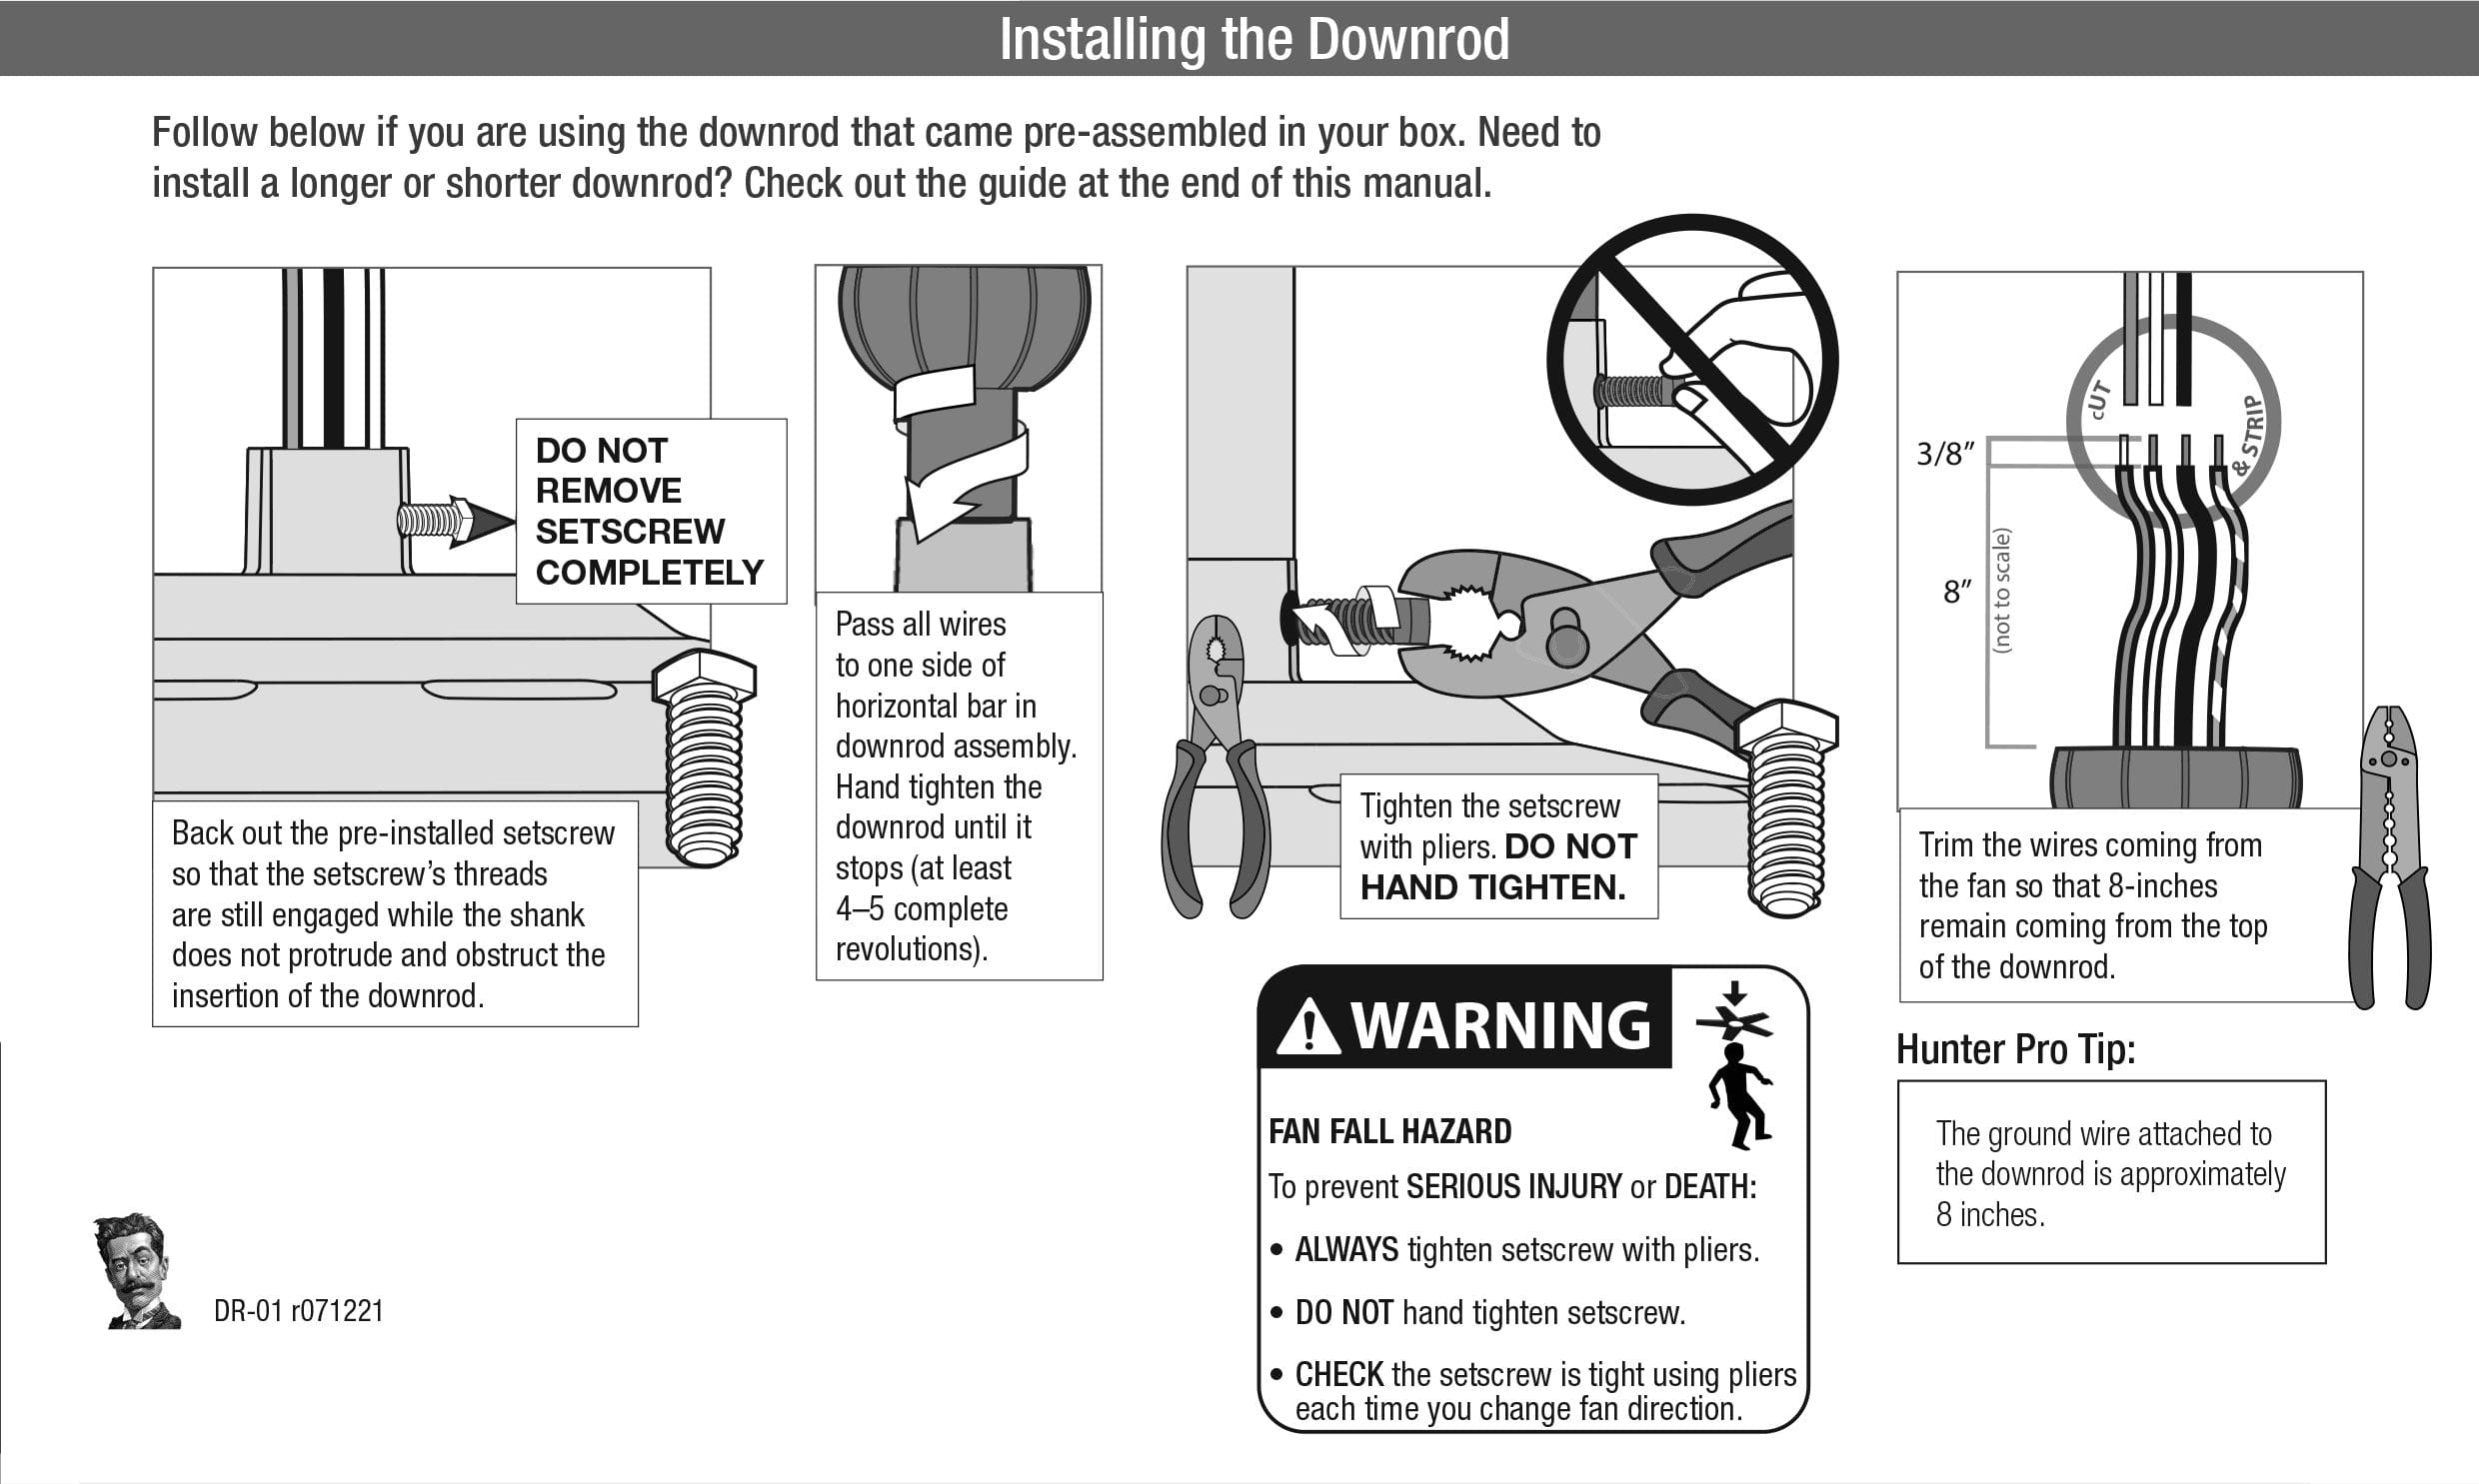
Para ventiladores de tubo de extensión
Hay dos formas de asegurar el soporte de suspensión del ventilador de techo al techo: utilizando los tornillos para metales incluidos con la caja apta para ventiladores de techo o utilizando los tornillos para madera y las arandelas incluidas con el ventilador Hunter. Si utiliza los tornillos para madera para asegurar el soporte a una estructura con una caja eléctrica aprobada, deberá perforar orificios guía de 9/64" en la estructura de soporte.
01. Retire el tornillo de fijación preinstalado del adaptador del motor de modo que las roscas del tornillo de fijación sigan acopladas mientras que el vástago no sobresalga y obstruya la inserción del tubo de extensión.
02. Pase los cables conectados al ventilador a través del tubo de extensión y luego ajústelo con la mano. Este paso requerirá al menos cuatro o cinco vueltas.
03. Apriete el tornillo de fijación con unos alicates. No lo apriete con la mano.
04. Usando un cortador de alambre, corte los cables, dejando 8 pulgadas de cable desde la parte superior del tubo de extensión.
05. Usando un pelacables, pele 3/8 de pulgada de la parte superior de los cables.
06. Deslice el dosel sobre el tubo de extensión y los cables.
07. Levante el ventilador por el tubo o carcasa e inserte la bola del tubo de extensión en la ranura del soporte del techo.

Para ventiladores de perfil bajo
Al instalar un ventilador de perfil bajo, puede montar el motor y cablearlo sin usar un tubo de extensión o un dosel. El soporte de un ventilador de perfil bajo tiene un aspecto diferente al de un ventilador con tubo de extensión, pero se fija al techo de las mismas dos formas: con los tornillos para máquina incluidos en la caja de clasificación del ventilador de techo o con los tornillos para madera y las arandelas incluidos con el ventilador Hunter. Para fijar el soporte del ventilador con tornillos para madera en una estructura con una caja eléctrica aprobada, taladre orificios guía de 9/64 pulgadas en la estructura de soporte.
01. Manteniendo los cables fuera del camino, levante el conjunto del motor y deslice la bola colgante cuadrada dentro de la abertura en el soporte del techo.
02. Ubica el cable de conexión a tierra que está conectado a la parte superior del eje del motor. Asegúrate de que el cable de conexión a tierra esté orientado hacia afuera de la abertura grande del soporte del techo.
03. Fije el motor al soporte del techo con dos tornillos de bloqueo.
NOTE: Este es el proceso para instalar ventiladores de techo de perfil bajo de estilo tradicional. Sin embargo, tenemos dos estilos de instalación diferentes para ventiladores de perfil bajo además de este proceso que son diferentes. Si su modelo de ventilador de perfil bajo no tiene la bola colgante cuadrada, consulte el manual de instalación para obtener instrucciones específicas.
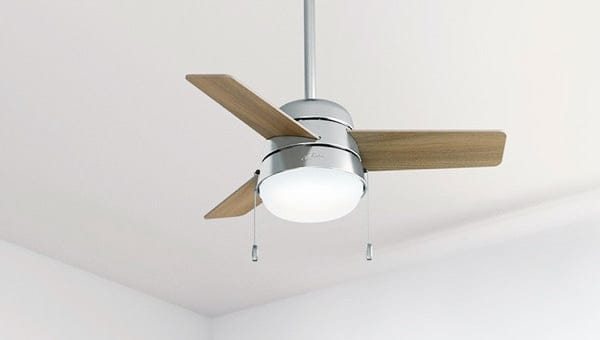
Para techos inclinados
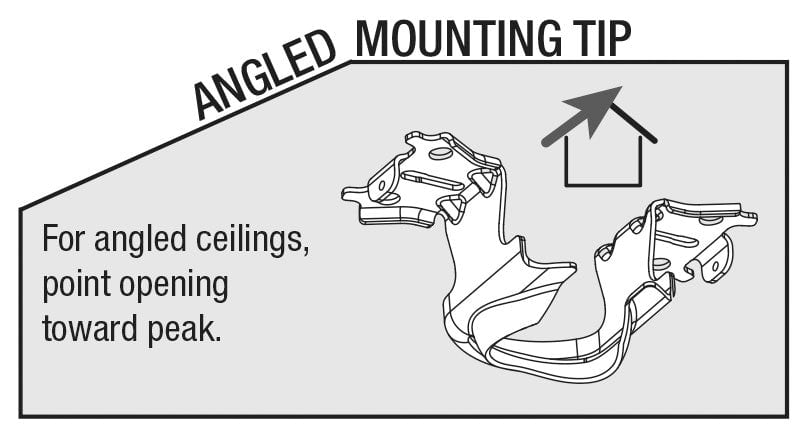
Para instalar su ventilador de techo en un techo inclinado, necesitará comprar un tubo de extensión más largo (se vende por separado) y, según la inclinación del techo y el tipo de ventilador, es posible que también necesite un adaptador de montaje en ángulo para ventilador de techo.
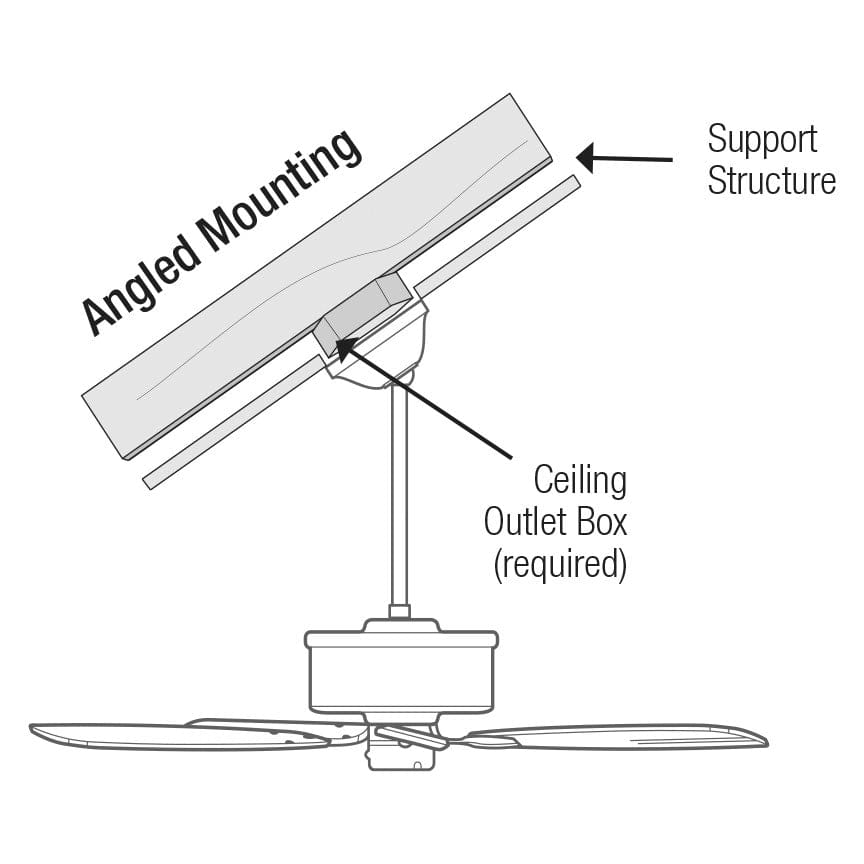
Imprima nuestra guía de montaje en techo inclinado y siga estos pasos para aprender cómo instalar un ventilador de techo en un techo inclinado:
01. Primero, asegúrese de que su modelo de ventilador de techo sea compatible para ser instalado en techos inclinados.
| Tipo de Ventilador | ¿Se puede instalar mi ventilador de techo en un techo inclinado? | ¿Necesito un adaptador de techo inclinado? |
|---|---|---|
| Ventiladores de montaje con tubo de extensión (excepto Hunter Original) | Si | No es necesario un adaptador para ángulos de techo de hasta 34°. Para ángulos de techo mayores de 34°, necesitará un adaptador. |
| Ventilador Hunter Original | Si | Para cualquier inclinación de techo superior a 45°, necesitará el accesorio de montaje en ángulo del sistema Original para reemplazar la cubierta que viene con su ventilador Original. |
| Ventilador de Perfil Bajo | No | N/A |
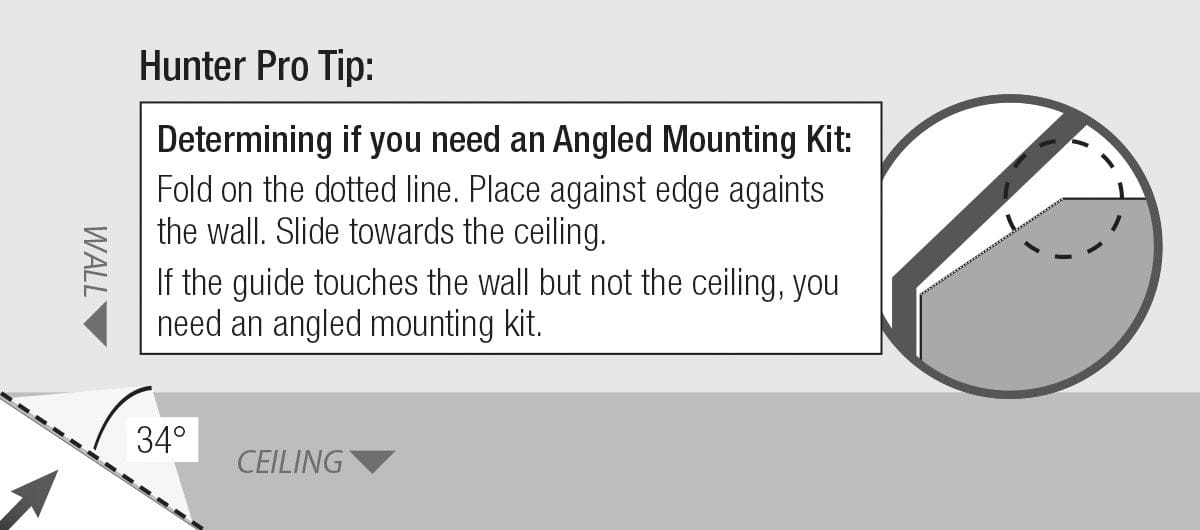
02. Suponiendo que su ventilador es compatible con techos en ángulo, determine el equipo que necesita para un ventilador de techo con montaje en ángulo.
Para Ventilador Original:
Los techos en ángulo de hasta 45 grados necesitarán un kit de montaje en techo en ángulo original. Este soporte de techo en ángulo reemplaza el dosel. No se puede instalar un control remoto en el soporte de techo en ángulo original debido al espacio reducido. Para instalaciones con un control en un techo en ángulo, consulte a un electricista.
Para todos los demás ventiladores Hunter con tubo de extensión:
El soporte de techo en ángulo, también conocido como SCA-P (adaptador para techo inclinado, pintable), será necesario para techos con un ángulo mayor a 34 grados, pero menor a 56 grados. Este sistema se utiliza junto con el sistema de suspensión suministrado con su ventilador de techo. Los accesorios Hunter y los controles montados en el dosel aún se pueden instalar dentro del sistema de suspensión suministrado con su ventilador. Para techos en ángulo con una inclinación mayor a 56 grados, comuníquese con un electricista para obtener un dispositivo de montaje personalizado. No olvide verificar que la caja eléctrica de su ventilador esté aprobada para su uso con ventiladores de techo.
Tubos de extensión
Se necesita un tubo de extensión para instalar el ventilador de techo en un techo inclinado. Al elegir la longitud del tubo, tenga en cuenta que el ventilador de techo debe estar a 30 pulgadas de la pared y otros objetos y que las aspas del ventilador deben estar a 7 pies o más del piso.
03. Con el soporte de montaje y el tubo de extensión adecuados, siga las instrucciones anteriores desde PASO 2 (Instalar el soporte de montaje del ventilador de techo) así como las instrucciones posteriores para que los ventiladores de tubo completen la instalación.
Una vez que haya completado la instalación del soporte del ventilador de techo, estará listo para pasar al siguiente paso, que es el cableado del ventilador de techo.
Paso 3.
Conecte el ventilador de techo

Comencemos con los conceptos básicos sobre cómo conectar el ventilador de techo: junte los extremos de metal desnudo de los cables y conéctelos con una tuerca para cables. Gire la tuerca para cables en el sentido de las agujas del reloj hasta que quede bien ajustada. Tire ligeramente del cable para asegurarse de que ninguno esté suelto.
ADVERTENCIA: Todo el cableado debe realizarse de acuerdo con los códigos eléctricos nacionales y locales ANSI/NFPA 70.
Si no se siente cómodo conectando el ventilador, consulte con un electricista profesional certificado.
Cableado de un ventilador con una cadena de tracción estándar
Los ventiladores de techo con cadena de tracción no vienen con ningún tipo de receptor remoto. Para ventiladores de techo sin receptor remoto, siga estos pasos para conectar el ventilador.
Si tiene un solo interruptor de pared, utilice las tuercas para cables para:
01. Conecte el cable blanco (conectado a tierra) del techo al cable blanco del ventilador.
02. Conecte el cable negro (sin conexión a tierra) del techo a los cables negro y azul del ventilador.
03. Conecte los tres cables de conexión a tierra (verde, raya verde/amarilla o cobre desnudo) que vienen del techo, el tubo de extensión y el soporte colgante.
Si tiene un interruptor de pared doble, utilice las tuercas para cables para:
01. Conecte el cable blanco (conectado a tierra) del techo al cable blanco del ventilador.
02. Conecte el cable negro (sin conexión a tierra) del techo al cable negro del ventilador.
03. Conecte el segundo cable sin conexión a tierra (luz) del techo al cable azul del ventilador.
04. Conecte los tres cables de conexión a tierra (verde, raya verde/amarilla o cobre desnudo) que vienen del techo, el tubo de extensión y el soporte colgante.

Cableado de un ventilador con un receptor remoto preinstalado
Los ventiladores de techo Hunter con receptores remotos preinstalados tienen el receptor integrado en el cuerpo del ventilador de techo en la fábrica. Nuestros ingenieros innovaron esta tecnología para ayudar a simplificar el cableado de un ventilador de techo. Las bases de control remoto se pueden colocar en la pared. Puede acoplar los controles remotos en las bases para usarlos como un interruptor en la pared o quitar los controles de la base y usarlos como controles remotos portátiles. El interruptor de luz que alimenta el ventilador de techo probablemente será un interruptor de pared simple o doble.
Si tiene un solo interruptor de pared, use una tuerca para cables para:
01. Conecte el cable blanco (conectado a tierra) del techo al cable blanco del ventilador.
02. Conecte el cable negro (sin conexión a tierra) del techo al cable negro del ventilador.
03. Conecte los tres cables de conexión a tierra (verde, raya verde/amarilla o cobre desnudo) que vienen del techo, el tubo de extensión y el soporte colgante.
04. Cubre el cable azul del ventilador. No lo necesitarás para el cableado de un solo interruptor.
Si tienes un interruptor de pared doble, los pasos para conectar los cables con una tuerca para cables serán similares a los pasos anteriores. La única diferencia es que, en lugar de tapar el extremo del cable azul en el paso n.° 4, utilizarás una tuerca para cables para conectar el segundo cable sin conexión a tierra (luz) del techo al cable azul del ventilador.

Cableado de un ventilador con un receptor remoto
La mayoría de los ventiladores de techo Hunter vienen equipados con un receptor remoto preinstalado o independiente. Si se pregunta cómo conectar un ventilador de techo con un receptor remoto independiente, use las tuercas para cables para:
01. Conecte el cable negro (sin conexión a tierra) del techo al cable negro del receptor.
02. Conecte el cable blanco (conectado a tierra) del techo al cable blanco del receptor y al cable blanco del ventilador.
03. Conecte el cable amarillo del receptor al cable negro del ventilador.
04. Conecte el cable azul del receptor al cable azul del ventilador.
05. Conecte los tres cables de conexión a tierra (verde, raya verde/amarilla o cobre desnudo) que vienen del techo, el tubo de extensión y el soporte colgante.
Paso 4.
Termine de instalar la cubierta o la carcasa del motor.
Si va a instalar un ventilador de techo que requiere un tubo de extensión, deberá terminar de instalar la cubierta. Si va a instalar un ventilador de techo de perfil bajo, deberá terminar de instalar la carcasa del motor.

Ventiladores con tubo de extensión
Para instalar la cubierta de un ventilador con tubo de extensión:
01. Coloque los cables y las tuercas para cables en la caja de conexiones.
02. Levante el dosel hasta colocarlo en su lugar, asegurándose de que las aberturas triangulares y los orificios de los tornillos estén alineados.
03. Con un destornillador, inserte y ajuste firmemente los tornillos de la cubierta. Un destornillador magnético le dará más visibilidad al fijar la cubierta.

Ventilador de Perfil Bajo
Para instalar la carcasa del motor de un ventilador de techo de perfil bajo:
01. Coloque los cables y las tuercas para cables en la caja de conexiones.
02. Levante la carcasa del motor hasta que quede correctamente posicionada sobre el motor y los soportes del techo.
03. Gire la carcasa del motor hasta que los orificios de los tornillos estén alineados con los orificios del soporte. La hendidura dentro de la carcasa debe encajar en su lugar con la muesca dentro del soporte del techo.
04. Sujete la carcasa del motor en su lugar. Utilice un destornillador para insertar y fijar firmemente los cuatro tornillos de la carcasa del motor.
Paso 5.
Instalar las aspas
Su ventilador Hunter viene con las piezas necesarias para instalar las aspas. Existen tres métodos comunes de instalación de aspas para ventiladores de techo Hunter:

Ventiladores con aspas de acero
01. Inserte los ojales en cada orificio en el extremo de las aspas.
02. Utilice los tornillos respectivos para fijar cada aspa a los soportes de la misma.
03. Coloque las aspas de acero con el motor, asegurándose de que todos los orificios de los tornillos estén correctamente alineados. Apriete ligeramente los tornillos con la mano y, a continuación, utilice un destornillador para apretarlos bien.
Aspas de cuerpo medio
01. Inserte las aspas en las aberturas y alinee las aberturas de los orificios de las aspas con los soportes de estas.
02. Fije cada aspa a un soporte de aspas utilizando las tres arandelas y los tornillos de montaje de aspas incluidos. Asegúrese de que los tornillos estén bien apretados.
Aspas a presión
01. Alinee los tres orificios de la aspa con los tres postes de acero de la aspa.
02. Apriete la aspa y el poste de acero de la aspa para unirlos. Tenga en cuenta que las partes superiores ensanchadas de los postes de acero de la aspa quedarán completamente visibles por encima de la aspa cuando estén correctamente ensamblados.
Step 6.
Instalar la iluminación

Ventiladores de conexión rápida y ventiladores sin conexión rápida
Para ensamblar un ventilador con un kit de iluminación, primero identifique si su ventilador tiene una función Quick Connect examinando la carcasa del interruptor. Los ventiladores Hunter Quick Connect tienen un mecanismo de bloqueo distintivo ubicado en la carcasa del interruptor. Estos ventiladores también tienen un anillo que rodea la carcasa del interruptor en el medio. Los ventiladores Hunter sin tecnología Quick Connect no tienen ninguna de las dos funciones.
Ventiladores con luces

01. Antes de comenzar, retire el protector de cartón del tapón.
02. Conecte los enchufes del ventilador y de la lámpara. Asegúrese de alinear las marcas de colores en los conectores.
03. Empuje los conectores y el cable adicional en el orificio ubicado en la parte superior de la lámpara.
04. Conecte con cuidado la luminaria a la parte inferior del ventilador. Asegúrese de que los orificios del anillo de montaje en la parte superior de la luminaria estén alineados con los espacios del soporte de montaje en la parte inferior del ventilador.
05. Mientras sostiene el cuerpo del ventilador sin moverlo, gire la lámpara en el sentido de las agujas del reloj para enganchar el pasador de bloqueo. Escuche hasta oír un clic para verificar que el pasador de bloqueo esté bien colocado.
06. Retire los anillos del zócalo para poder instalar el cristal de la luz.
07. Después de instalar el vidrio, vuelva a instalar los anillos de luz en los portalámparas.
08. Utilice la herramienta de vidrio para el anillo del zócalo que viene con el ventilador para girar los anillos de luz en el sentido de las agujas del reloj hasta que queden apretados.
09. Instale los focos en cada portalámparas.

01. Elija dos orificios en la placa de montaje de la carcasa del interruptor para atornillar dos de los tornillos del conjunto de la carcasa hasta la mitad.
02. Pase el conector del cable a través del centro de la carcasa del interruptor superior.
03. Envuelva las ranuras de los ojos de cerradura alrededor de los tornillos y luego gire en sentido antihorario.
04. Utilice un destornillador para instalar el tercer tornillo y luego apriete los dos tornillos restantes.
05. Instale parcialmente dos de los tornillos de la carcasa del interruptor hasta la mitad.
06. Conecte la carcasa del interruptor superior e inferior utilizando los conectores, asegurándose de alinear las marcas de colores.
07. Ubique las muescas en los lados de la carcasa del interruptor inferior y alinéelas con los tornillos ubicados en la carcasa del interruptor superior.
08. Bloquee la carcasa del interruptor en su lugar girando la parte inferior en el sentido de las agujas del reloj.
09. Con un destornillador, instale el tercer tornillo de la carcasa. Apriete todos los tornillos.
10. Para instalar las pantallas de las lámparas, primero afloje los tornillos de mariposa. Luego, levante cada pantalla hasta la luminaria e inserte y ajuste cada tornillo de mariposa.
11. Instale un foco en cada casquillo.
12. Conecte los colgantes de cadena de tracción a las cadenas cortas apropiadas que vienen de la carcasa del interruptor.

01. Conecte los conectores del ventilador y de la lámpara. Asegúrese de alinear las marcas de colores en los conectores.
02. Fije los conectores empujándolos y el cable adicional en el orificio ubicado en la parte superior de la luminaria. Este paso garantizará que el ventilador y la luminaria se monten correctamente.
03. Levante con cuidado la luminaria y colóquela en la parte inferior del ventilador. Asegúrese de que los orificios del anillo de montaje ubicado en la parte superior de la luminaria estén alineados con los espacios del soporte de montaje ubicado en la parte inferior.
04. Mientras sostiene el cuerpo del ventilador, gire la lámpara en el sentido de las agujas del reloj para enganchar el pasador de bloqueo. Escuche el sonido de clic para verificar que la conexión esté segura.
05. Levante el globo y utilice los tres tornillos de mariposa provistos para fijarlo a la luminaria. Apriete los tornillos de mariposa con la mano.
06. Instale el foco en el portalámparas.

01. Elija dos orificios en la placa de montaje de la carcasa del interruptor para atornillar dos de los tornillos del conjunto de la carcasa hasta la mitad.
02. Pase el conector del cable a través del centro de la carcasa del interruptor superior.
03. Envuelva las ranuras de los ojos de cerradura alrededor de los tornillos y luego gire en sentido antihorario.
04. Utilice un destornillador para instalar el tercer tornillo y luego apriete los dos tornillos restantes.
05. Instale parcialmente dos de los tornillos de la carcasa del interruptor hasta la mitad.
06. Conecte la carcasa del interruptor superior e inferior utilizando los conectores, asegurándose de alinear las marcas de colores.
07. Ubique las muescas en los lados de la carcasa del interruptor inferior y alinéelas con los tornillos ubicados en la carcasa del interruptor superior.
08. Bloquee la carcasa del interruptor en su lugar girando la parte inferior en el sentido de las agujas del reloj.
09. Con un destornillador, instale el tercer tornillo de la carcasa. Apriete todos los tornillos.
10. Pase la cadena de tracción del ventilador a través del orificio ubicado en la parte inferior del kit de iluminación.
11. Instale los focos en cada uno de los portalámparas.
12. Coloque el globo y el soporte del globo contra la placa de metal, manteniéndolos alineados.
13. Pase la cadena de tracción de la luz a través del orificio ubicado en el centro de la tapa del remate. Luego, pase la cadena de tracción del ventilador a través del orificio ubicado en el costado de la tapa.
14. Pase únicamente la cadena de luz a través del remate. Fije el remate al tubo roscado y ajústelo con la mano.
15. Conecte las cadenas cortas que salen de la carcasa del interruptor a los colgantes de cadena de tiro adecuados.
Instalación del ventilador sin la luz
No todos los ventiladores tienen la opción de instalarse sin un kit de iluminación. Primero, debes determinar si tu modelo de ventilador se puede instalar sin un kit de iluminación. Los ventiladores con luces integradas en el cuerpo del ventilador normalmente no se pueden instalar sin la luz, excepto en una cantidad limitada de modelos. Es posible que se pueda quitar el kit de iluminación de los ventiladores con kits de iluminación en el brazo o en el cuenco e instalar una tapa sin luz. ¿Cómo instalo mi ventilador sin el kit de iluminación? Una tapa sin luz cubre la parte del ventilador donde normalmente se instalaría un kit de iluminación. Si prefieres usar una tapa sin luz en lugar de un kit de iluminación y tu modelo de ventilador es compatible, sigue estos pasos para instalarlo correctamente.

01. Retire los dos tornillos del kit de luz que conectan el kit de luz a la carcasa del interruptor inferior.
02. Desconecte los cables azul y blanco dentro del kit de luz y la carcasa del interruptor inferior.
03. Para tapar de forma segura los cables que no se utilizan, instale el terminal ficticio que se incluye con la tapa de la luz. Conecte el terminal a los extremos de cada cable ubicados en la carcasa inferior del interruptor.
04. Utilice un destornillador Phillips para instalar la tapa de la carcasa del interruptor con los dos tornillos de la carcasa del interruptor que quitó anteriormente.
05. Conecte la carcasa del interruptor superior e inferior con los conectores. Asegúrese de alinear las marcas de colores en los conectores.
06. Levante con cuidado la carcasa del interruptor y colóquela en la parte inferior del ventilador.
07. Coloque los orificios en el anillo de montaje ubicado en la parte superior de la carcasa del interruptor con los espacios en el soporte de montaje ubicado en la parte inferior del ventilador.
08. Mientras sostiene el cuerpo del ventilador lo más quieto posible, enganche el pasador de bloqueo girando la luminaria en el sentido de las agujas del reloj. Escuche hasta oír un clic para verificar que la conexión esté segura.
Paso 7.
Utilice los controles remotos
Hunter ofrece una variedad de controles del ventilador de techo que facilitan el control del ventilador y la luz. La mayoría de los controles remotos portátiles y de pared vienen emparejados previamente con el ventilador de techo.

Controles remotos portátiles
Los controles remotos portátiles le permiten controlar cómodamente las funciones de su ventilador. Siga estos pasos para usar el control remoto portátil de su ventilador de techo:
01. Instale la batería incluida en la parte posterior del control remoto.
02. Para encender y apagar el ventilador, simplemente presione el botón del ventilador.
03. Cambie la velocidad del ventilador con el botón de flecha.
04. Para cambiar la dirección del ventilador, mantenga presionado el botón del ventilador.
05. Para encender y apagar la luz del ventilador de techo, presione el botón de luz.
06. Mantenga presionados los botones de flecha para habilitar las opciones de luz regulable del ventilador de techo. Mantenga presionado el botón de luz para atenuar la luz del ventilador de techo.
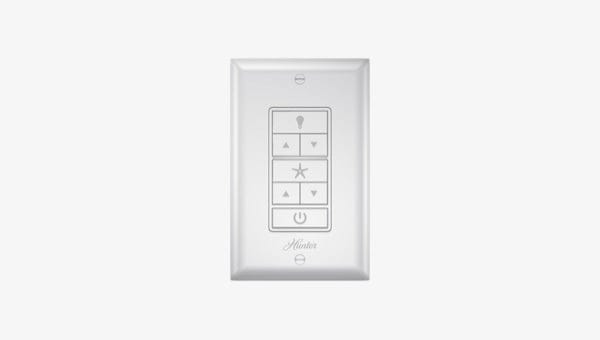
Controles de pared
Los controles de pared se instalan en el interruptor de pared, lo que facilita recordar dónde se encuentra el control del ventilador de techo. Siga estos pasos para usar el control de pared:
01. Simplemente presione el botón del ventilador para encenderlo y apagarlo.
02. Cambie la velocidad del ventilador con el botón de flecha.
03. Encienda y apague la luz del ventilador de techo presionando el botón de luz.
04. Use los botones de flecha para ajustar la luz regulable.

Controles de ventiladores inteligentes
Los controles de ventiladores inteligentes permiten usar su teléfono inteligente o dispositivos domésticos inteligentes para controlar su ventilador de techo. Nuestra colección SIMPLEconnect® de ventiladores de techo con Wi-Fi se controla con nuestra aplicación SIMPLEconnect en su teléfono inteligente y relojes. También puede controlarlos con dispositivos domésticos inteligentes como Apple HomeKit, Amazon Alexa y Google Assistant./p>
Si se ha estado preguntando cómo instalar un ventilador de techo, es de esperar que esta guía de instalación de ventiladores de techo de Hunter le ayude a realizar el proceso correctamente. Recuerde que contratar a un electricista profesional certificado siempre es una opción si no se siente cómodo con alguno de los pasos mencionados anteriormente.
Después de instalar su nuevo ventilador de techo Hunter, es posible que deba realizar un mantenimiento periódico del ventilador de techo de vez en cuando. Utilice nuestros sencillos consejos de instalación de ventiladores de techo para mantener su ventilador Hunter funcionando en excelentes condiciones.
Paso 8.
Instalación de un ventilador de techo HunterExpress®
La instalación de ventiladores HunterExpress es tan fácil como 1-2-3: Preparar, Conectar, Completar.

Siga estos pasos para instalar su ventilador de techo HunterExpress:
1. Preparar
Dado que estos kits de ventiladores contienen un cuerpo preensamblado, puede comenzar directamente a instalar el soporte de alimentación. Utilice un destornillador eléctrico para facilitar el trabajo.
Luego, utilice el mini destornillador incluido para fijar el cableado al soporte de alimentación.
2. Conectar
Fije la carcasa del ventilador junto con la cubierta al soporte de alimentación.
El cableado plug and play hace que la conexión de los componentes sea sencilla y rápida.
A continuación, coloque el dosel en su lugar.
3. Completar
Instale las aspas sin necesidad de herramientas encajándolas en su lugar.
Añade la cubierta de vidrio del componente de iluminación.*
*Tenga en cuenta: no todos los ventiladores HunterExpress son exactamente iguales, por lo que las instrucciones para instalar la cubierta de vidrio pueden variar según el modelo.
Y como el control remoto ya viene emparejado, operar el ventilador Hunter Express es muy fácil.